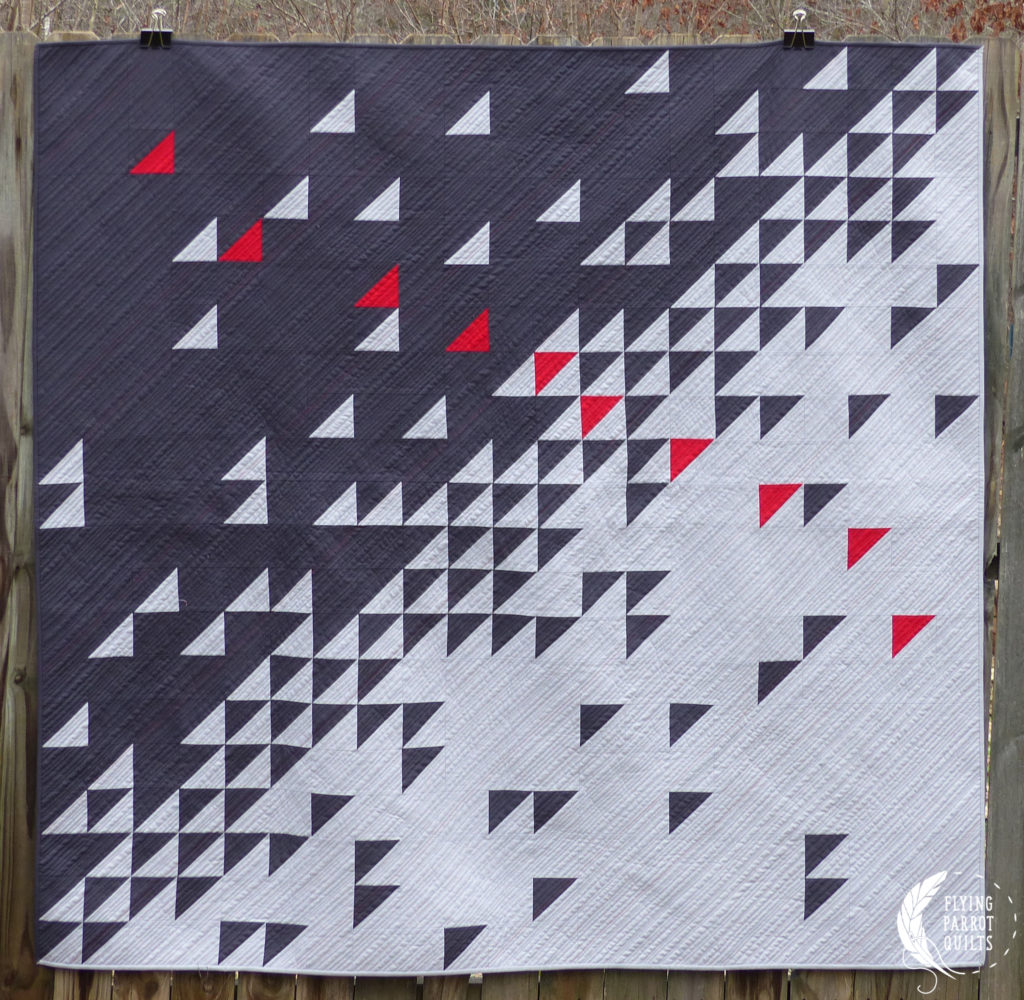
In Part 1 of this series, we covered adding blocks to your quilt and resizing paper piecing patterns and other blocks made up of templates. In Part 2, we’re going to talk about what to do when you can’t just add more blocks to a quilt design because it will change the design, and instead you need to resize the whole quilt pattern. Here’s an example of a quilt I’ve sometimes gotten questions about resizing, my Meeting of the Geese lap quilt:

Adding more gray blocks around the edges would make the red triangles less prominent, and without the addition of more of those red triangles, you’d lose some of the effect. And what if you wanted to make it a wallhanging instead of a lap-sized quilt? What you’ll need to do is resize all the elements of the quilt.
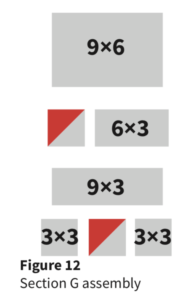
Although it’s called Meeting of the Geese, it’s actually made up of half-square triangles. In this case, they’re 3″, and because I never recommend doing more piecing than you have to, the negative space is made up of larger panels. Here’s a very small section of the pattern:

So let’s say you want to make a wallhanging instead, made up of 2″ x 2″ HSTs. Since the base element is 3″, what you need to do is divide all the other measurements by 3″, then multiply by your new base element (2″). So for the top piece there, 9″ x 6″ divided by 3″ becomes 3 x 1; then multiply by 2″ to get 6″ x 4″. You’ll have to do this for all the pieces.
Keep in mind that if the measurements include your ½” seam allowance you’d have to subtract that first, and then add it back in at the end.

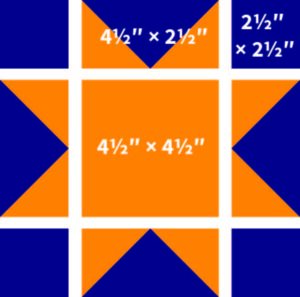
You can use the same concept for quilt blocks, but as with the full quilt, you want to be careful to choose a resizing that won’t make your measurements super awkward. The block above is 8″ x 8″ finished; it wouldn’t work very well to resize to, say 7″ x 7″.
This block is based on a 4 x 4 grid, and the base unit here is is 2″ x 2″ (the block image above includes seam allowances), so that’s where you want to start your resizing. So, resizing to a 12″ block would make sense because it would make your smallest square 3″; even 10″ would be reasonable with a finished size square of 2½”, but you probably don’t want to get into weirder sizes then that.
So, to resize to 12″ (your corner squares will be 3″ finished):
| Center square | Flying Geese units | |
| Original size | 4½” x 4½” | 4½” x 2½” |
| Subtract out seam allowance | 4″ x 4″ | 4″ x 2″ |
| Divide by 2″ base unit size | 2 x 2 | 2 x 1 |
| Multiply by new base unit size (3″) | 6″ x 6″ | 6″ x 3″ |
| Add the seam allowance back in | 6½” x 6½” | 6½” x 3½” |
Keep in mind that none of this is appropriate for figuring out how to make subunits such as flying geese or half-square triangles. For those, just figure out how big the finished size needs to be and then consult a guide on how to make units in this size:
So there you have it! A little math, but totally worth it to get a quilt in your perfect size.


Great series and an explanation of some of the things I love most about quilting: quilt math!!
I am not a math person, but you just answered a question I have long been wanting an answer for: How to resize a pattern for 2 1/2 inch strips down to 1 1/2 inch strips. But this leaves me with a yardage problem and I don’t want to mess it up trying to reverse engineer the math in part one of your article. Perhaps there will be a part three in this series?
AN ASIDE: I first met you on Craftsy and loved your work. Now I have rediscovered you through Modern Quilt Guild. I’m glad you are here to inspire us!
I for one love the math of quilts. I recently showed, and got a ribbon, for a quilt I sized up significantly from the original pattern. The original was a Mini called Cabin Skein by Carrie Nelson. I loved it so much little that I thought I’d love it even more big. One of the blocks featured prominently in the quilt was many flying geese. So keeping the twice as wide as high rule of the FG I figured out how big they needed to be to be sized from a 20″ x 20″ to 70″ x 70″. So both quilts have the exact same number of pieces, and same color scheme, but not all the same fabrics. I have the Artichoke pattern I just haven’t made it :(, I’m sure from when you were at Craftsy.